Why make this recipe
There’s something magical about warm, sweet fruit paired with creamy cheese. Baked pears with blue cheese and honey have a delightful combination of flavors that elevate any meal. This dish is perfect for cozy gatherings or a special date night. It marries the rich sweetness of pears with the sharpness of blue cheese, creating an unforgettable treat that’s both simple and elegant.
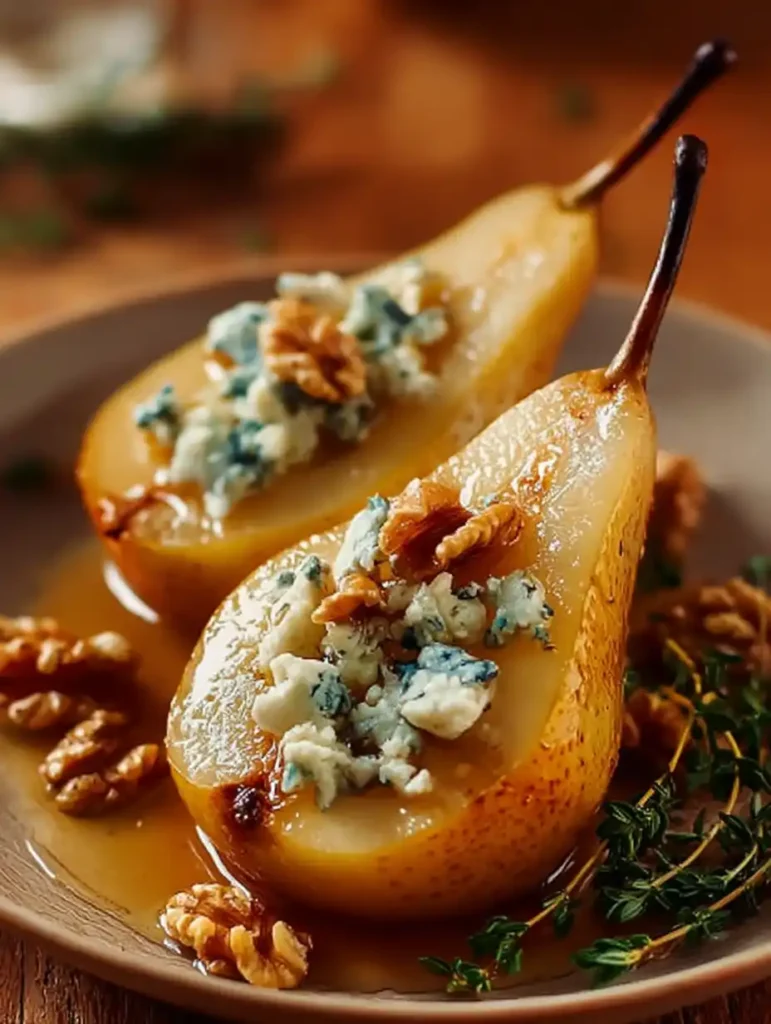
What Makes This Elegant Warm Baked Pears Special
This recipe stands out for its unique blend of flavors and textures. The juicy, tender pears provide a sweet base, while the blue cheese adds a creamy and tangy punch. Drizzling honey over the top enhances the overall sweetness, creating a contrast that excites the palate. The optional walnuts add a lovely crunch, and a sprinkle of fresh parsley brings a touch of color and freshness to the dish.
Ingredients:
- 4 ripe pears
- 4 oz blue cheese
- 2 tbsp honey
- 1 tbsp butter
- 1/4 cup walnuts (optional)
- Cinnamon (optional)
- Fresh parsley for garnish (optional)
Optional grouping
Dry Ingredients:
- Walnuts (optional)
- Cinnamon (optional)
Wet Ingredients:
- Honey
- Butter
Directions:
- Preheat the oven to 350°F (175°C).
- Cut the pears in half and scoop out the cores.
- Place the pear halves in a baking dish, cut side up.
- Fill each pear half with crumbled blue cheese.
- Dot with butter and drizzle honey over the top.
- If desired, sprinkle walnuts and a pinch of cinnamon.
- Bake in the preheated oven for 25-30 minutes, or until pears are tender.
- Serve warm, garnished with fresh parsley if using.
Optional step details
Prep:
- Preheat the oven and prepare your baking dish.
- Cut and core the pears.
Cooking:
- Assemble the pears with cheese and toppings before baking.
Finishing touches:
- Serve garnished with parsley for a fresh look.
Helpful tips for Elegant Warm Baked Pears
- Choose ripe pears for the best sweetness and texture.
- Feel free to experiment with different types of cheese, such as goat cheese or gorgonzola, for varied flavor profiles.
- Adjust the amount of honey based on your taste preference.
Special Ingredient Notes
- 4 ripe pears: Look for pears that are slightly soft when pressed for the best flavor.
- 4 oz blue cheese: Any quality blue cheese will work; consider a milder cheese if you’re not a fan of strong flavors.
- 2 tbsp honey: Use raw honey for a more complex flavor.
- 1 tbsp butter: This adds richness don’t skip it!
- 1/4 cup walnuts (optional): Chopped walnuts are great for added texture.
- Cinnamon (optional): It pairs well with the sweetness of the pears.
- Fresh parsley for garnish (optional): Adds a splash of color and freshness.
How to serve Elegant Warm Baked Pears
Serve the baked pears warm, right out of the oven. They make a fantastic dessert but can also be served as an appetizer. Drizzle extra honey on the dish and garnish with walnuts and parsley for a beautiful presentation.
How to store this recipe
Fridge
Store any leftovers in an airtight container in the fridge for up to 2 days. Reheat gently in the microwave or oven before serving.
Freezer
It’s best not to freeze this dish, as the pears may become mushy once thawed.
Variation
You can try different nuts, like pecans or almonds, for added crunch. Additionally, consider adding a splash of balsamic glaze instead of honey for a tangy twist.
Notes
This recipe was inspired by the desire to create a simple yet elevated dish that showcases the beauty of baked fruit. It’s a quick and enjoyable way to impress guests or treat yourself.
PrintElegant Warm Baked Pears
This dish combines warm, sweet pears with creamy blue cheese and a drizzle of honey, perfect for any gathering or special occasion.
- Prep Time: 10 minutes
- Cook Time: 30 minutes
- Total Time: 40 minutes
- Yield: 4 servings 1x
- Category: Dessert
- Method: Baking
- Cuisine: American
- Diet: Vegetarian
Ingredients
- 4 ripe pears
- 4 oz blue cheese
- 2 tbsp honey
- 1 tbsp butter
- 1/4 cup walnuts (optional)
- Cinnamon (optional)
- Fresh parsley for garnish (optional)
Instructions
- Preheat the oven to 350°F (175°C).
- Cut the pears in half and scoop out the cores.
- Place the pear halves in a baking dish, cut side up.
- Fill each pear half with crumbled blue cheese.
- Dot with butter and drizzle honey over the top.
- If desired, sprinkle walnuts and a pinch of cinnamon.
- Bake in the preheated oven for 25-30 minutes, or until pears are tender.
- Serve warm, garnished with fresh parsley if using.
Notes
Choose ripe pears for the best sweetness and texture. Feel free to experiment with different types of cheese and adjust the honey based on your taste preference.
Nutrition
- Serving Size: 1 serving
- Calories: 250
- Sugar: 20g
- Sodium: 300mg
- Fat: 15g
- Saturated Fat: 8g
- Unsaturated Fat: 5g
- Trans Fat: 0g
- Carbohydrates: 35g
- Fiber: 3g
- Protein: 4g
- Cholesterol: 25mg
FAQs
Can I use ripe pears for this recipe?
Yes, ripe pears work best as they are tender and sweet.
What type of blue cheese should I use?
Go for your favorite blue cheese variety; some are milder than others.
Can I prepare this dish in advance?
You can prepare the pears and filling ahead of time, but bake them just before serving to enjoy the warm texture.
Is there a substitute for honey?
Maple syrup can be a delicious alternative.
How can I make this dish vegan?
You can use coconut yogurt or a vegan cream cheese and replace the honey with agave syrup.
Final Thoughts
Elegant Warm Baked Pears with Blue Cheese and Honey Drizzle is a dish that can impress anyone, thanks to its fascinating flavor profile and simplicity. Whether you’re hosting a party or enjoying a quiet evening, this recipe brings warmth and comfort to any table. Enjoy the delightful combination and make it a regular part of your culinary repertoire!






Leave a Reply